Skype camera black/blank screen problem, is one of the most common problems on Windows 10, and can be caused by a number of reasons, so here’s a step-by-step guide khổng lồ how to lớn fix it.
In Windows 10, a new update can cause many problems with your integrated webcam, & the camera may not work or the camera may not be recognized in some applications while it is working properly in others. For example, I have seen a case where while the camera was working without any problem in the Webex và Zoom applications, it was displaying a đen screen in Skype.
Bạn đang xem: Hướng Dẫn Cách Sửa Lỗi Skype Webcam Issues On Windows 10
This guide contains step-by-step instructions to fix several problems with the integrated camera on laptops with Windows 10: *
Webcam/Camera is not working on Windows 10Webcam/Camera Stopped working after Update in Windows 10.Webcam does not work on some applications (Skype, Windows Hello WebEx, etc.).Webcam displays a black (or blank) screen when used on Skype.Webcam is Working on Skype but displays a black screen in camera preview window.Applications cannot recognize or find the Camera/Webcam
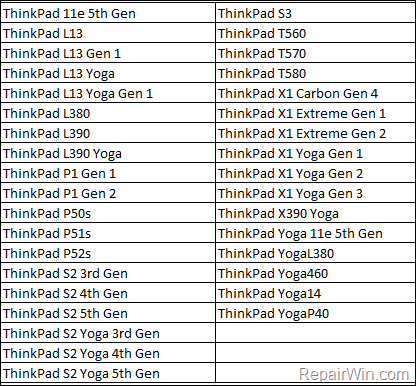
* Notice for Lenovo Think
Pad owners: If you own one of the Think
Pad models listed on the below table, proceed to download and install this registry patch from Lenovo. The patch fixes an issue where integrated camera driver might not work properly after upgrading to Windows 10 version 1709 or later.
How khổng lồ FIX: Webcam issues on Windows 10.
Nội dung
1 How lớn FIX: Webcam issues on Windows 10.
Step 1. Allow Camera Access to Apps.
On Windows 10, Camera & Microphone may not available to lớn applications due to Privacy settings that may have applied. So, proceed và allow the application with the camera problem, to access your camera. For example, if you face the camera issue on Skype, proceed as follows:
1. Navigate to go to Start thực đơn

a. Ensure that Camera access for this device is on. If not, click Change và set to lớn ON.b. Then set lớn On the Allow apps khổng lồ access your camera switch.
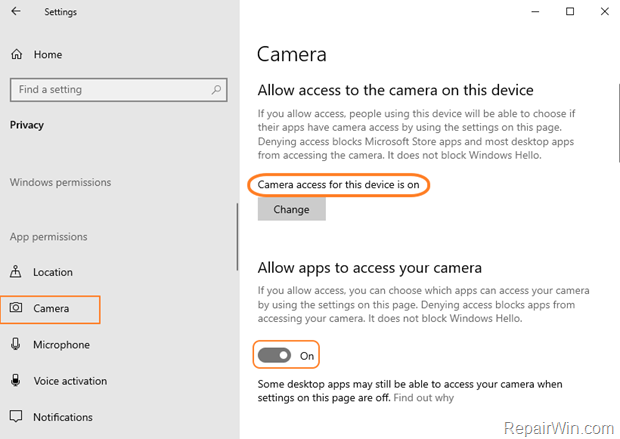
Now, scroll down, and…
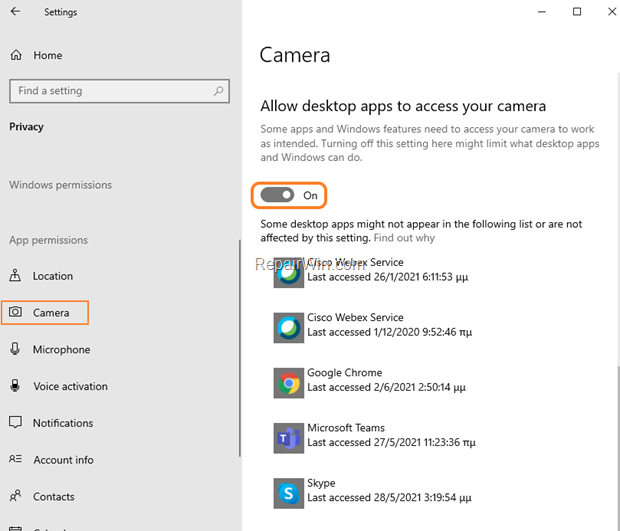
c. If you are experiencing the issue of the black camera screen on Skype store app, scroll down & at Choose which Microsoft Store apps can access your camera section, mix Skype to On.

d. If you see a đen screen window of your camera while using the Skype for Windows (desktop application), then ensure that the Allow desktop apps to access your camera switch is On.
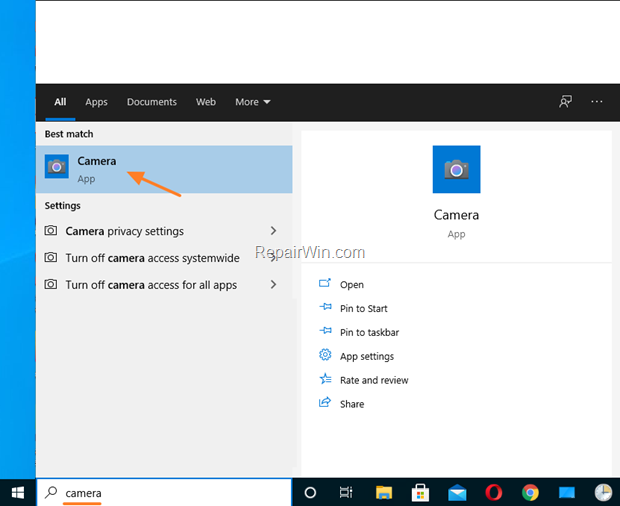
Step 2. Kiểm tra if your Camera is working properly.
One of the first steps in troubleshooting your webcam is to confirm that it works in the Windows 10 Camera app.
1. At tìm kiếm box, type camera to mở cửa the Camera app.2. Click the Magnifier and tìm kiếm for “camera“.3. Mở cửa the Camera application
3. Now, according the result, proceed as follows:
A. If your camera is working, you should see your image on screen. At this case, proceed and check your camera on Skype or in any other ứng dụng you use it. If the Webcam doesn’t work or displays a black screen, apply the below steps in order:
Try lớn uninstall và re-install the application with the camera problem (e.g. Skype).Proceed to lớn Enable or to lớn Disable the Frame server Mode in Registry by following instructions on step-3.B. If your camera doesn’t work either in Camera app, one of the following things can happen:
The camera device driver is incorrect or damaged. At this case proceed lớn troubleshoot camera drivers by following the instructions on step-4.The camera is damaged and is not working at all. In this case, go to lớn a computer repair siêu thị to fix your webcam or use an external USB camera.Step 3. Fix Webcam đen Screen issue in Windows 10 Registry.
If the camera is recognized & works without problem in some apps, but it doesn’t work in others, or displays a đen screen on Skype, try lớn disable or khổng lồ enable the “Frame vps Mode” in registry.
1. Mở cửa Registry Editor: to vì chưng that:
1. Press Windows

3. In Registry Editor navigate lớn the following key at the left pane:
HKEY_LOCAL_MACHINESOFTWAREMicrosoftWindows truyền thông media Foundation
Platform
4. Right-click at an empty space on the right pane và select New -> DWORD (32-bit) Value.
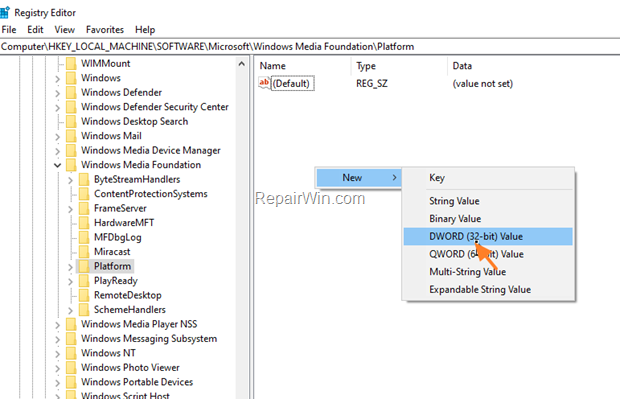
5. Give the name Enable
Frame
Server
Mode to the new value.6. Double-click at the newly created value and make sure that the value data is 0. (Zero). Click OK.
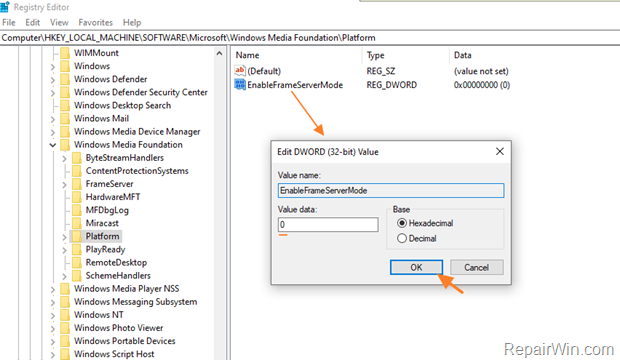
7. Now, follow the same steps above (4,5 & 6), và make the same changes at this key:
HKEY_LOCAL_MACHINESOFTWAREWOW6432NodeMicrosoft
Windows truyền thông media Foundation
Platform
8. When done, close Registry Editor and restart your PC.9. After restarting, launch Skype and check if the problem with Web
Cam has been solved. If not, follow the same steps, but this time enable the Enable
Frame
Server
Mode by changing its value from 0 to 1 and restart your PC again.
Step 4. Troubleshoot Webcam Driver.
The next step, to fix Camera problems in Windows 10, is to roll back or to uninstall/reinstall Camera’s drivers. 1. Open Device Manager. To bởi vì that:
1. Press Windows

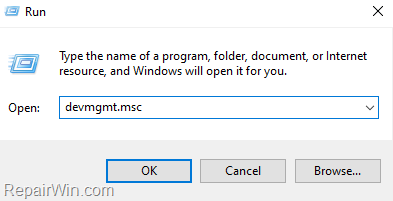
2. Expand Imagine Devices (or Cameras)3. Right-click on your Camera and choose Properties.
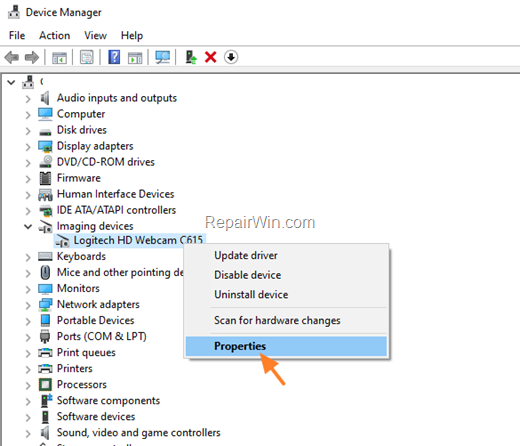
4. Select the Driver tab và proceed as follows according your case:
A. If your Webcam was working before, Roll Back Driver & restart your PC. Then kiểm tra if your camera is functioning.

B. If your camera has never worked before, or if it is the first time that you try your camera (e.g. After a fresh Windows install), try the following in this order:
Click the Update Driver option, to kiểm tra for an updated driver of your camera. If Windows finds a new driver, install it, và then check your Webcam. Otherwise…Click Uninstall Device to uninstall the Webcam and then restart your PC. After restart, check if your camera is working. If not…Navigate lớn your máy tính xách tay manufacturer support site and check if its available a new driver for your Webcam & install it.Additional Help to fix Camera Issues on Windows 10.
If you still have problems with your webcam after the above steps, try the following:
Install all available Windows 10 updates (Start -> Settings -> Update & Security & click Check for updates).
Update Windows 10 khổng lồ latest version by using the Update Assistant. (To vị that navigate lớn this link and click the Update Now button).
That’s all folks! Did it work for you? Please leave a phản hồi in the phản hồi section below or even better: like and cốt truyện this blog post in the social networks to lớn help spread the word about this solution.
If this article was useful for you, please consider supporting us by making a donation. Even $1 can a make a huge difference for us.
Has stopped working error is a fairly common error on the computer. Here I will guide you how khổng lồ effectively fix Has stopped working error. Click view now!
If one day you are using your computer & you have a Has stopped working error without knowing the cause or how khổng lồ fix Has stopped working error on a Windows 7/10 computer , please refer to the article below.
The cause of the error has stopped working :
System error: Virus, malware , .Because the hard drive is fragmented.Due khổng lồ software conflicts installed on the operating system.Error due khổng lồ RAM.It could also be that the đoạn clip card installed is faulty or the Driver is old and out of date.1. Edit in Registry
Note : The instructions below are done on Windows 10 , for Windows 7 vì chưng the same.
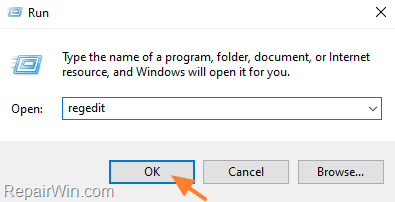
Step 1 : mở cửa the Run dialog box (press Windows + R key combination ) and enter the command Regedit > Click OK .

Step 2 : Next, you access the following path:
Computer
HKEY_CURRENT_USERSoftware
Microsoft
Windows
Windows Error Reporting .

Step 3 : Double click on the Dont
Show
UI key .

Step 4 : Change the value at Value data lớn 1 > Click OK .

Step 5 : Restart the computer to lớn apply the changes.
2. Disable some apps running in the background
Step 1 : open the Run dialog box (press Windows + R key combination ) và Enter the command msconfig > Click OK.

Step 2 : Go to lớn the Services tab > Select Hide all Microsoft services > Click Disable all khổng lồ disable all Services and click OK .

Step 3 : Restart the computer khổng lồ apply the changes.
3. Defragment your hard drive
Bạn yêu cầu "chăm sóc" ổ cứng giả dụ đã thực hiện nó vào một khoảng tầm thời gian. Cũng chính vì lỗi Has stopped working này cũng có thể là bởi vì phân vùng ổ cứng của doanh nghiệp đang bị phân mảnh. Câu hỏi cần làm của người sử dụng là đánh giá xem liệu ổ cứng đang dùng gồm thực sự là vì sao dẫn đến tình trạng này tốt không.

4. Dọn dẹp máy tính
Lỗi này đôi lúc cũng hoàn toàn có thể bị gây ra bởi những file tạm với file rác rưởi do máy vi tính tạo ra sau một thời hạn hoạt động. Cũng chính vì thế chúng ta hãy liên tiếp sử dụng những công cụ dọn dẹp vệ sinh máy tính nhé.
Xem thêm: Giới thiệu 13 bộ đồ chơi nấu ăn thu nhỏ ở nhật bản, lạ lùng với đồ chơi nhật bản ăn được

5. Sử dụng ứng dụng diệt Virus
Virus cũng là trong những nguyên nhân có thể gây ra lỗi Has stopped working trên máy tính xách tay của bạn. Hãy thực hiện các phần mềm diệt virut uy tín nhằm diệt virus tương tự như là đảm bảo an toàn máy tính kị khỏi những sự vắt và lỗi không ước ao muốn.

Trên đây nội dung bài viết đã hướng dẫn một trong những cách khắc phục và hạn chế lỗi Has stopped working trên laptop windows 7/10. Hy vọng nội dung bài viết sẽ góp ích cho bạn!